WebSphere Hypervisor version 7. Follow this URL http://www-01.ibm.com/software/webservers/appserv/hypervisor/
You need to download the following

When searched in infocenter for hypervisor, it gave me very clear instructions. Here are those links
http://publib.boulder.ibm.com/infocenter/wasinfo/v7r0/index.jsp?topic=/com.ibm.websphere.virtualimages.doc/info/ae/ae/welcome_virtual.html
http://publib.boulder.ibm.com/infocenter/wasinfo/v7r0/index.jsp?topic=/com.ibm.websphere.virtualimages.doc/info/ae/ae/tins_virt_install_vmware_esx.html
So, you those files from IBM. Whatelse you need?
1. SLES 10, sp3.
Goto novell.com, get SuSE Linux Enterprise Edition.
2. VirtualBox -
http://www.virtualbox.org/
Download virtualbox, install it, create a suse virtual machine.
3. Get cygwin.
http://www.cygwin.com/
4. Before you begin, you need to mount these tgz files to cygwin.
When cygwin is installed it creates directories like this
Directory Structure
Cygwin attempts to duplicate the directory structure of a Linux System within the "c:\cygwin" folder:

To not waste time on mounting another directory into cygwin, simply copy those tgz files to c:\cygwin\tmp, which are avaliable thru cygwin shell.
5. Now, openup a cygwin shell.
You have downloaded tgz file. A tgz file is a gunzip file. To uncompress it, in general, one can use gunzip command.
gunzip filename.tgz
is an example.
Or, on linux platforms, tar gives a switch *z* to uncompress gz, tgz files
Now, at the cygwin prompt -
cd /tmp
tar xvzf filename.tgz
Use the above command and replace filename.tgz with all those four files.
This uncompresses tgz file to a tar file and tar file will be uncomplressed.
6. Above command creates files like
vmdk, vmx files.
7. For ease of use, I have created another directory say, c:\vmdk_files
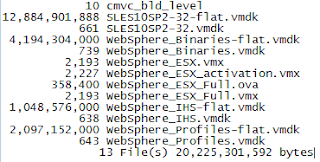
and copied all these files into that directory. These are the files -

8. So, we have vmdk files, and virtual machine. By the way, what is a vmdk file? :)
vmdk = virtual machine disk.
When we create a virtual machine, it will create a hdd readable by it. virtualbox by default creates vdi file. vmdk is another kind of such virtual disk file. Now, we need to add that virtual disk to the virtual machine as a secondary disk.
9. This is how you do it -
Open ur virtualbox
point to the virtual machine

As pointed in the above, I have selected suse, under that, select *Storage*.
10.

As shown above, hit on that *Add Attachment*, it gives two options, add hard disk or cd/dvd/. Select, obviously, disk.
11.

So, we mounted these vmdsiks to our virtual machine. Lets start and see -
12. These 4 are the mounted disks -


2 comments:
Is ESX server needed or not? Please share next steps as well.
Uday
Thx for visiting my blog and leaving a message.
I myself stuck @ loading vmx into virtualbox.
Do you need ESX? My idea is to replace ESX with VirtualBox. So, you will be using one among these two.
Post a Comment